Updated: 08 Feb 2012 Embedding Album Art Images into Mp3 files
End Result
The first thing you will need is a program to embed your Mp3 files. I recommend Mp3tag its is excellent and FREE. MP3TAG
1) Once you have installed the program, start it up and located an Mp3 album you want to embed.
2) Then highlight all the tracks and Select from the tool bar the World/ internet logo, Then select "Amazon. de" (usually works the best)
Click image to enlarge
3) A new dialog box will appear and you can choose the correct album, As shown below
Click image to enlarge
4) Then another dialog box will appear showing the files new infomation and Album Art. Click OK. As shown below.
Click image to enlarge
5) Thats it! you can now transfer the Album to your N95 phone and the Album Art will show up Automatically.
Editing Mp3's using iTunes
Apple iTunes can be used to edit Mp3 for N95 and N95 8GB, i personally prefer to use MP3tag but many people already use iTunes so i have created this simple tutorial to show how easy it is to edit Mp3 info and add album artwork.
You cannot edit the N95 directly using iTunes therefore you will have to edit the albums in your "iTunes Library". There is no need to register with apple to get artwork but you will have to manually search for the Album Covers, this allows you to create you own picture if you want.
Editing iTunes Library
1. First use Google Image Search to find the Album Artwork you want and save it on your Desktop (Make sure it is a exact square but cropping in photoshop if necessary) I recommend using images of 256x256 pixels or more and they must BE .JPEG or .JPG NOT .PNG files.
2. Open iTunes and select Library / Music from the left hand panel, there are 3 views formats List, Album and Cover flow (my preferred). I have used Cover flow as it easy to see the images.
3. Highlight the Album you want to edit by selecting all the tracks (Select one track and use Shift Key and select bottom track) then right click and select Get Info, as shown in the images below:
4. Now a Mp3 edit box will appear, Check that the Info is correct and if no Artist name appears it is because there are differences in the name. iTunes has a few categories which are useful to clear avoiding albums fragmenting.
I would tick the box but leave blank "Album Artist", "Compilation" and "Disc number"
Then double click on the Artwork box and locate the image you saved earlier.
Then click ok to complete
5. If you are adding a new image to an album with artwork, i have found it is better to remove the old image first, by checking the box and leaving blank, and then redoing the process with the new image.
6. That's it you should now be able to connect up you N95 and move the Tracks from your music library to your phone via the PC suite or Nokia Phone Browser.
Nokia Default Ringtones Do you miss your old polyphonic ringtones? Well probably not that much, But if you want to find an old favourite or just a bit of phone Nostalgia, here's something for you.
The default ringtones on Nokia phones are stored on the internal memory and are difficult to extract but i have hosted some i found a while ago for you to download Nokia Tones Zip
Creating Ringtones and Message Alert tones from Mp3 music
This tutorial will show you how to create a short music clip to use on your phone as Ringtone or Message tone.
You will need an Mp3 music file (song), Mp3 editor (MP3direct cut), Pc or Mac to edit and transfer the file to the Phone.
Most Ringtones only need to be up to 20 seconds in length as an Answer phone will usually cut in at around 17 sec. Message tone length is your personal choice as you will be the one listening to it but usually they are less than 10 sec in length.
1. Download Mp3DirectCutand install on your Computer.
2. Start the program and Select File/ Open ... and select your Mp3 music file
3.You can now edit your song. Use the Play/Stop buttons to listen to the track, then select the Start of the track by using the Left mouse click and the End by using the right mouse click. As shown below left. Now go to Edit from the Menu and and Select Crop.
4. Now you have your music clip you can create a simple start Fade in and Fade out for the end of the Track. This can be easily done by selecting a short segment at the start of the track then go to Edit on the Menu and select Create simple fade. You can listen to the new edit by pressing the Play button. As shown Above right. Repeat this at the end of the track to create a simple Fade Out.
5. To save your new Clip go to File from the Menu and select Save all to save your ringtone. Now you just need to transfer to your phone via Nokia Pc suite or by bluetooth etc.
Two other useful features on Mp3directcut are:
To remove a portion of a track, just simply highlight the part you want to remove and select 'Delete' on your computer.
If the sound level is too high or too low, highlight your selection and Go to Edit / Gain here you can increase or decrease the levels (It is best to lock your left and right channels).
Personalised Album Art using MP3TAG and MP3 EXT (For PC) If you want to embed Personalised Album Art into MP3 tracks before you transfer them to your Phone you can easily do this with MP3TAG, but first i want to show you a great freeware program for viewing MP3 files on your PC. This hasn't got anything to do with N95 it only works when viewing on windows PC, but its so good i had to mention it!
MP3 ext
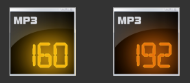
This program was last updated in 2004, so its not new but its so under-used, i Love it!!. Below is an screenshot of part my MP3 music collecton. (Yeah they are all icons the album art work)
When i view and Album details using MP3ext i can see the Bitrate quality of each track, below we can see that there are a few different quality rates.This is because they are downloaded from different sources. The program works on XP and Vista, you can choose different icon themes, but i have created my own, which you can see below, if you want a copy of the icon set. Click either icon below. I have updated the icon set and put some Install notes in the zip file as it can get a bit complicated to set the theme.
Adding Personalised Album Artwork with MP3TAG MP3TAG is a freeware application for Windows PC that allows you to edit MP3 info which includes adding album art, which will show up in your N95.
Applications like iTunes and Windows Media player 11 can add artwork to Mp3 tracks that you buy online but other music you may have download usually doesn't have any album art or has artwork on some tracks or poor quality images. Below you can see that the Thriller album has already has some album art, but strangely its of the cd back? and two other tracks have nothing, but using the MP3ext i can see the bitrate quality as an icon, rather than just showing a MP3 symbol.
Once you have downloaded and Installed MP3TAG you can rightclick on any MP3 folder using the shell extension and select Mp3tag. Now select all the tracks ( Ctrl A) and in the Tag panel (which i undocked) right click on the Album Art circle symbol and select Add Cover
This will open a dialogue box where you can navigate to any image you have saved. I have found that the optimum size of an image for the N95 album artwork is 160x160px, although i make mine 256x256 because i view most album art on my PC, the larger image is compressed slightly by the phone which reduces the quality. I have downloaded 2 images of the Thriller, one traditional cover and one alternative take of the cover.
I simply select the image i want, adjust any other tags like Comments and Genre (Don't get me started) and select Save.
Now you can see that when i view the albums on my laptop InList and Details view you can see the Mp3 info and it shows the MP3ext bitrate as an icon (rather small), but when i increase the size in Tiles, Icon (Small, Med. and Large etc) i can see the album artwork i embedded earlier.
Now all you need to do is transfer it to you phone and the Artwork will now appear in your music player when you play the tracks.
UPDATED 08 FEB 2012 This tutorial will show you how to create a Symbian S60 3rd edition theme for Nokia N95. I used the Nokia Carbide.ui S60 theme edition 3.1.1. (latest version 3.4) to make the theme and Adobe Photoshop CS3 to edit the Backgrounds. The finished theme is shown right. In this example we will be creating "Handle key pairs" certificate, adding Active/Inactive backgrounds, Creating "transparent Navi pane" and adjusting colours to match the theme. Note: All images can be enlarged by clicking. Download & Details Of latest Nokia Carbide Theme Creator below: NokiaCarbide For a basic starter guide:
Getting Started
You will need two images which you use for the theme.
The Inactive screen will be your image or picture that will be displayed when the phone is in idle.
The active screen will be shown when you are using applications like text messaging, gallery, music player, therefore it is probably best to be a faded or plain image otherwise it will detract from the application you are using.
The images are best edited before you create the theme with a program like Adobe Photoshop and cropped to 240pixels X 320pixels. To achieve a clearer image in landscape view it better to use a 320 x 320px image. (Thanks for this tip form the comments section).
1) Install the carbide program and select
"Create a new theme", then name it, Keep "Base graphics" selected this is the default for S60 3rd edition.
2) You will now see a default theme which you can edit. the first thing to do is edit the Active background.
Select "Background" from the Resources tab on the left, then select the top grey rectangle next to the panel.
Right click the background in the "Active background" tab in the centre bottom of the screen, and select "Convert and edit in bitmap editor"(which should have been set up in the installation) as shown below.
3) Now your bitmap editor (Photoshop etc.) will launch and you can move your saved image on to the theme background, Then flatten the image and SAVE, then return to Carbide and your new background should appear.
4) Repeat this for the Inactive screen, and you should end up with an image , shown right.
5) Now you will notice that there is a blue line across the Clock symbol. This is the navigation pane and is better to be set it to match the background rather than being blue. To can be a little tricky so follow carefully.
First select "Areas" from the resources panel on the left, then "Status Area" then select the bottom of the three rectangular images next to the panel,
Then select the Navi pane from the "Navi pane background" panel.
Now right click the box and select Edit/Animate, this will change the details to a layers shown below, Now you can edit the "navi pane layer" layer tab, right click on the layer1 and select "Add background".
Then remove the old blue layer by right clicking on the layer one again and selecting "delete layer"
as shown right
6) Now you can edit the colours to match your theme, this is done from the "Colours" section in the resources tab on the left. There are a lot of colours that you can change, so try whatever you like, i changed the text colour and main title to light grey as well as a few other alterations , shown below
7) Now that the Theme is finished remember to "save" it. Now we need to create a "handle key Pair" which is your certificate/owners rights. The carbide program can create one for you. First select Tools from the Menu bar, then selectHandlekeypairs, A dialog box will open select "New" it will prompt you to enter an title , it can be anything , like "Theme cert" etc. then select "Make keys" Now a new dialog box will appear, as shown right, fill out your details, then select generate. now it will return to the earlier box and now select "SAVE"
8) Now you have your certificate you can use it for every theme you create, all that is left is to create a .sis file Go to Tools in the menu bar and select "Create new sis package", a dialog box will appear in which you can change some Information/settings, Then select next, in the new box the Key pair should be highlighted, then select finish The program will ask you if you want to transfer to your phone now, that's up to you just remember where the .sis file is saved, most likely C:Program Files/Nokia/carbide.../workspace...
I use the Nokia PC suite to transfer .sis files, When installing to the phone a message that the certificate is untrusted, but as you made it , it's OK!!
5800 Default Themes For N95
Yan Flahorn has released a N95 Theme based on the 5800 default theme. He says he spent 3 months working on it! and the amount of detail is impressive. There are 600 New icons most based on 5800 icons and .svg images which sort out the problems with landscape mode. The themes (Blue and Red) were highlighted over at the SymbianFreak. You can download the for N95 and N96 from his website at deviantart.com. For N95 use Touch Blue by Flahorn.sis & Touch Red by Flahorn.sis not the FP2 versions.
Adding Badges and Logos to your N95 & N95 8GB
If you want to add a football team badge or any other logo to your Main idle screen you can easily do it without having to create a theme. All you need to do create an image with a transparent background. You will need a PC application like Adobe Photoshop to create the image.
Here are the basic tips for creating the Image 1) Download an Image, logo or Badge from the Internet 2) Remove the background & Edit the image with Photoshop or similar program. 2) Make the image 240 x 235 pixels 3) Save the Image as a .png 4) Transfer to your Phone 5) Find the Image in the Gallery and "Set as wallpaper"
There are 2 small problems with using this system to display logos
1) The image will be stretched in Landscape Mode 2) The Phone display shows a slightly darker shading to the area that is transparent. The visibility of the shading depends on your themes colour.
Alternatively you could just make a complete theme with the logo to avoid both of these problems.
Here are a couple of Transparent logos i made which you can use. To download click the image to open full size then right click and "Save Image As".
Sending Themes via bluetooth If you want to send a theme to a friend via bluetooth, you will need to zip the file to send it as the N95 does not let you send Theme .sis files via bluetooth. This is quite easy to do using the Zip Manager inbuilt in the N95 & N95 8GB.
Here is a quick guide on how to send themes via bluetooth:
Create the Zip
1. You will need to transfer the Theme .sis file to your phone (rather than opening it and installing), you can store it in any location, just remember where you put it.
2. Now go to Menu/ Applications/ Office/ Zip. Open the application and select Options/ New Archive. Now name you New zip folder, then select Options / Add Archive and select the theme .sis file. As shown in the screenshots below
Send the Zipped Theme
1. Now to send the Zipped theme use the file manager to locate the Zip archive folder you created and select Options/ Send/ via Bluetooth
2. If you haven't already turned on your bluetooth, it will prompt you and start bluetooth and then locate other devices. Then find your friends phone and SEND.
To Extract and Install the theme
1. Once the Bluetoothed Zip folder is saved on your friends phone they can located it from your Inbox and simply open the zip folder which will launch the Zip Manager and then start the install process or:
2. Go to Menu/ Applications/ Office/ Zip. Open the Zip application and locate to Zip Archive Folder, then open the Zipped Theme. Which will start the theme Installation. As shown below.
My Themes
Sullivan's Travels This is a screenshot from Sullivan's Travels, a classic feel good comedy made in 1941. It was directed by Preston Sturges and if you haven't seen it and like old Movies you're going to love it ! Joel McCrea and Veronica lake at their best!
I used the base template i created for Hollywood 1940. I had to rebuild a lot of the image to fit nicely on the screen and i have rectified the Music player notes error (black on very dark grey) as well as improving incoming caller i.d colours. Download
Blue Ice Sheet This is my favourite of the four i have just created, mostly because the blue looks great on the phone. If you view in landscape you can see more of the image. I used to use this image as a desktop a while ago, if you want the full image email me and i'll send it. Download
Hollywood 1940's
Well i've been meaning to use this image for a while now, finally i got around to it, Its taken in the USA around the 1940's, if you recognise where or when it is or you can tell from the cars let me know. I used sepia tones for the signal/battery indicators. Download
Blue Water This is a simple Coast scene. What i liked about the image is that you actually seem to be in the water, and its sharpness of course! Download
Maserati Ghibli Updated - I have been using this theme i created for screenshots. Like all the later themes i have created it works in landscape mode without blurring the image. Download
Beach Scene Updated - A simple theme with wide screen image. Download
Gold Circuit board Updated - This theme continues my personal interest in Circuit boards! Download
Porsche 911 2.2s Updated - Classic porsche, no fancy bumper or fins, just early 1970 class! Download
Sandtroopers Wide Theme Updated - Whats better than stormtroopers ? . . . . Sandtroopers! just ask my Nephew. Download
Stormtrooper Wide Theme Updated - Now with wide screen and Music player updated background for firmware v.20 Download wide
Lamborghini Miura SV Updated - This theme shows the rear of the classic late 1960's Lamborghini. Download
Defender Wide Updated - This is a theme based on the Classic arcade game Defender. The colours are based on the original artwork. The Zip folder includes the .sis file and various .wav sound from the original game which you may want to used a message tones. This theme is not designed to be used with active standby as it will obscure the other graphics. Download
Hard day's Night Album cover - The Beatles
This themes certificate has expired, you can still install it if you first set your date back 1 year, install the theme then set the time back.
This theme is based on one of the most iconic album covers of all time, A Hard Day's Night by The Beatles. As usual with my themes the active screen is just plain colour so that it doesn't interfere with the open applications. Download
Taito Space Invaders 1978 theme Updated - This theme is based on the Original Taito Space Invaders arcade game made in 1978.
As with most of my themes the Operator logo is the same colour as the background so if you haven't removed the logo it will not show up on your screen. Download
Green Motherboard Updated - This theme is based a very busy image of a MotherBoard.The Indicators appear almost hidden amongst the maze of dots on the inactive screen, but that is the point. As with all these themes the active screen (Menu etc.) is a plain colour so not to interfere with your applications on screen. All the themes i have created do not have any Icon packs in them so your phone will automatically use the default N95 icons, which are much better quality than most basic phone icons. Download


 The first thing you will need is a program to embed your Mp3 files. I recommend Mp3tag its is excellent and FREE. MP3TAG


 Do you miss your old polyphonic ringtones? Well probably not that much, But if you want to find an old favourite or just a bit of phone Nostalgia, here's something for you.


 When i view and Album details using MP3ext i can see the Bitrate quality of each track, below we can see that there are a few different quality rates.This is because they are downloaded from different sources. The program works on XP and Vista, you can choose different icon themes, but i have created my own, which you can see below, if you want a copy of the icon set. Click either icon below. I have updated the icon set and put some Install notes in the zip file as it can get a bit complicated to set the theme.